跳转到主内容

6 篇博文 含有标签「Electron Internals」

'Technical deep dives through Electron's source code'

查看所有标签

WebView2 与 Electron

· 阅读时间:约 8 分钟

在过去几周里,我们收到了关于新的 WebView2 和 Electron 之间差异的几个问题。

我们两个团队都致力于让 Web 技术在桌面上能发挥出最佳效用,同时互相讨论比较了二者之间的共性与不同之处。

Electron 和 WebView2 都处在一个快速不断发展的进程中。 我们将对 Electron 与 WebView2 之间现有的相似之处与不同的地方做简短的概述。


架构概述

Electron 和 WebView2 都是从 Chromium 源代码构建的,用于渲染网页内容。 严格地说,WebView2 是从 Edge 源构建的,Edge 构建于 Chromium 源的一个分支上。 Electron 不与 Chrome 共享任何 DLL。 WebView2 的二进制文件与 Edge 硬链接(Edge 90 的稳定版本),因此他们共享磁盘和一些工作集。 更多信息,请参阅 Evergreen distribution mode

Electron 应用程序总是以开发时确认的 Electron 版本,打包和发布。 WebView2 有两个分布选项。 你可以打包确切的 WebView2 库到你的应用程序,或你可以使用系统中已经存在的共享运行版本。 WebView2 为每种方法提供了工具,包括缺少共享运行时的引导安装程序。 WebView2 从 Windows 11 开始直接提供。

打包框架的应用程序负责更新框架,包括安全的次要版本。 对于使用共享 WebView2 运行时的应用,WebView2 具有自己的更新程序,类似于 Chrome 或 Edge,独立于您的应用程序。 要更新应用程序自己的代码或其它依赖仍然是开发人员自己负责,这与 Electron 一样。 无论是 Electron,还是 WebView2 都不受 Windows Update 管理。

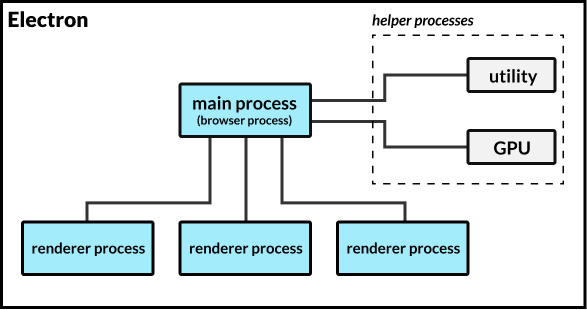
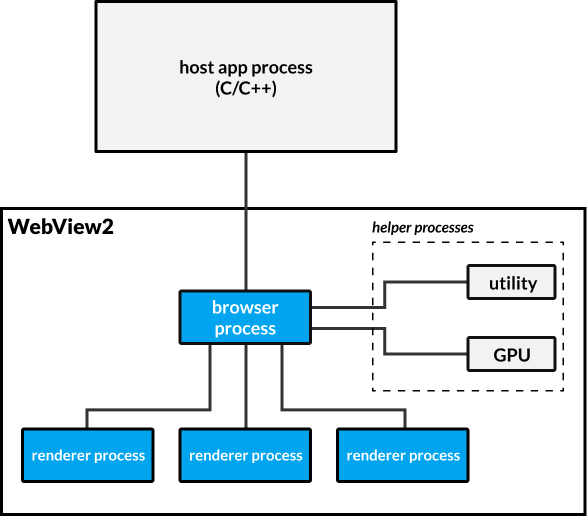
Electron 和 WebView2 都继承了 Chromium 的多进程架构,即一个主进程与一个或多个渲染器进程相连。 这些进程与系统上运行的其他应用程序完全分离。 每个 Electron 应用程序都是一个单独的进程树,包含一个根浏览器进程、一些公共进程以及零个或多个渲染进程。 WebView2 应用间使用相同的 用户数据文件夹 (就像一套应用一样),共享非渲染进程。 WebView2 应用使用不同的 数据文件夹,不共享进程。

  • ElectronJS 进程模型:

    ElectronJS 进程模型图解

  • 基于 WebView2 的应用程序进程模型:

    WebView2 进程模型图解

了解关于 WebView2 进程模型 Electron 进程模型 的更多信息。

Electron 提供常见的桌面应用程序所需要的 API,如菜单、文件系统访问、通知等等。 WebView2 是一个组件,意味着需要被集成到应用程序框架中,如 WinForms、WPF、WinUI 或 Win32。 WebView2 不提供 Web 标准 JavaScript 之外的操作系统 API。

Node.js 被集成到 Electron 中。 Electron应用程序可以在渲染进程和主进程中使用,任何 Node.js API,模块,或 node 本地模块(node-native-addon)。 WebView2 不知道您的应用程序使用哪种语言或框架编写。 您的 JavaScript 代码必须通过应用程序主进程代理操作系统访问。

Electron 努力维持与 Web API 的兼容性,包括从 Fugu Project 被开发的 API。 我们有一个 Electron 的 Fugu API 兼容快照。 WebView2 维护着一个 与 Edge 差异 API (API differences from Edge) 相似的列表。

Electron 为 web 内容提供一个可配置的安全模型,从完全访问到完全沙箱。 WebView2 内容始终是沙盒。 Electron 为您选择安全模型提供 全面的安全文档 。 WebView2 也有提供 安全最佳实践

Electron 源码在 GitHub 上维护与获取。 应用程序可以自己修改,构建属于自己的 独特 Electron. WebView2 源码不能在 Github 上获取。

摘要:

ElectronWebView2
构建依赖ChromiumEdge
源码在 Github
共享 Edge/Chrome 动态库是 (从 Edge 90 版本)
应用程序之间的共享运行时可选
应用程序 API
Node.js
Sandbox可选始终
需要应用程序框架
支持平台Mac, Win, LinuxWin (Mac/Linux 计划中)
应用之间的进程共享从不可选
框架更新管理通过应用程序WebView2

性能讨论

在渲染 Web 内容时,我们认为 Electron,WebView2 和其他基于 Chromium 的渲染之间的性能差异很小。 我们为感兴趣研究性能间差异的人员,以 Electron、C++ + WebView2 和 C# + WebView2 创建了 脚手架

在渲染 Web 内容 之外 有一些差异,来自 Electron,WebView2,Edge,PWA,和 其它表示感兴趣工作的详细比较。

进程间通信 (IPC)

我们明确强调一个差异,因为我们认为这通常是 Electron 应用程序中的性能考虑因素。

在 Chromium 中,浏览器进程(browser process)作为渲染进程沙盒与系统其部分间的 IPC 中间人。 虽然 Electron 允许未沙盒化的渲染进程,但很多应用程序仍选择启用沙盒以增加安全性。 WebView2 始终启用沙盒,所以对于大多数 Electron 和 WebView2 应用程序,IPC 可能会影响整体性能。

尽管 Electron 和 WebView2 具有相似的进程模型,但底层 IPC 不同。 在 JavaScript 和 C++ 或 C# 之间进行通信需要 转换(marshalling),常见的是 JSON 字符串。 JSON 序列化/解析是一项代价高昂的操作,IPC 瓶颈可能会对性能产生负面影响。 从 Edge 93 开始,Webview2 将针对网络事件使用 CBOR(简洁的二进程序列化)

Electron 通过 MessagePorts API 支持任何两个进程之间的直接 IPC,利用 结构化克隆算法。 利用此手段的应用程序可以避免在进程之间发送对象时支付 JSON 序列化税。

摘要

Electron 和 WebView2 有一些差异,但在他们如何执行 Web 内容方面不会有太大差异。 最后,应用程序架构和 JavaScript 库/框架对内存和性能的影响比其他任何内容都要大,因为无论 Chromium 运行在何处, Chromium 都是 Chromium

特别感谢 WebView2 团队审阅了这篇文章,并确保我们拥有 WebView2 架构的最新视图。 他们欢迎对项目的任何反馈意见

从原生应用到在Electron中使用JavaScript

· 阅读时间:约 4 分钟

C++或Objective-C写的Electron的功能如何被JavaScript访问,以便最终用户可以使用?


背景

Electron 是一个JavaScript 平台,其主要目的是降低门口,让开发人员能够构建强大的桌面应用,而不必担心平台的具体实现情况。 然而,在其核心上,Electron本身仍然需要特定平台的功能以特定的系统语言写入。

In reality, Electron handles the native code for you so that you can focus on a single JavaScript API.

How does that work, though? C++或Objective-C写的Electron的功能如何被JavaScript访问,以便最终用户可以使用?

To trace this pathway, let's start with the app module.

By opening the app.ts file inside our lib/ directory, you'll find the following line of code towards the top:

const binding = process.electronBinding('app');

This line points directly to Electron's mechanism for binding its C++/Objective-C modules to JavaScript for use by developers. This function is created by the header and implementation file for the ElectronBindings class.

process.electronBinding

These files add the process.electronBinding function, which behaves like Node.js’ process.binding. process.binding is a lower-level implementation of Node.js' require() method, except it allows users to require native code instead of other code written in JS. This custom process.electronBinding function confers the ability to load native code from Electron.

When a top-level JavaScript module (like app) requires this native code, how is the state of that native code determined and set? Where are the methods exposed up to JavaScript? What about the properties?

native_mate

目前,这个可以在native_mate找到答案解决方案,Chromium的一个 gin 分支库,它使得在C++和JavaScript的类型交互更加容易

Inside native_mate/native_mate there's a header and implementation file for object_template_builder. This is what allow us to form modules in native code whose shape conforms to what JavaScript developers would expect.

mate::ObjectTemplateBuilder

If we look at every Electron module as an object, it becomes easier to see why we would want to use object_template_builder to construct them. This class is built on top of a class exposed by V8, which is Google’s open source high-performance JavaScript and WebAssembly engine, written in C++. V8 implements the JavaScript (ECMAScript) specification, so its native functionality implementations can be directly correlated to implementations in JavaScript. For example, v8::ObjectTemplate gives us JavaScript objects without a dedicated constructor function and prototype. It uses Object[.prototype], and in JavaScript would be equivalent to Object.create().

To see this in action, look to the implementation file for the app module, atom_api_app.cc. At the bottom is the following:

mate::ObjectTemplateBuilder(isolate, prototype->PrototypeTemplate())
.SetMethod("getGPUInfo", &App::GetGPUInfo)

In the above line, .SetMethod is called on mate::ObjectTemplateBuilder. .SetMethod can be called on any instance of the ObjectTemplateBuilder class to set methods on the Object prototype in JavaScript, with the following syntax:

.SetMethod("method_name", &function_to_bind)

This is the JavaScript equivalent of:

function App{}
App.prototype.getGPUInfo = function () {
// implementation here
}

This class also contains functions to set properties on a module:

.SetProperty("property_name", &getter_function_to_bind)

.SetProperty("property_name", &getter_function_to_bind, &setter_function_to_bind)

These would in turn be the JavaScript implementations of Object.defineProperty:

function App {}
Object.defineProperty(App.prototype, 'myProperty', {
get() {
return _myProperty
}
})

function App {}
Object.defineProperty(App.prototype, 'myProperty', {
get() {
return _myProperty
}
set(newPropertyValue) {
_myProperty = newPropertyValue
}
})

It’s possible to create JavaScript objects formed with prototypes and properties as developers expect them, and more clearly reason about functions and properties implemented at this lower system level!

The decision around where to implement any given module method is itself a complex and oft-nondeterministic one, which we'll cover in a future post.

Electron Internals: Building Chromium as a Library

· 阅读时间:约 7 分钟

Electron is based on Google's open-source Chromium, a project that is not necessarily designed to be used by other projects. This post introduces how Chromium is built as a library for Electron's use, and how the build system has evolved over the years.


Using CEF

The Chromium Embedded Framework (CEF) is a project that turns Chromium into a library, and provides stable APIs based on Chromium's codebase. Very early versions of Atom editor and NW.js used CEF.

To maintain a stable API, CEF hides all the details of Chromium and wraps Chromium's APIs with its own interface. So when we needed to access underlying Chromium APIs, like integrating Node.js into web pages, the advantages of CEF became blockers.

So in the end both Electron and NW.js switched to using Chromium's APIs directly.

Building as part of Chromium

Even though Chromium does not officially support outside projects, the codebase is modular and it is easy to build a minimal browser based on Chromium. The core module providing the browser interface is called Content Module.

To develop a project with Content Module, the easiest way is to build the project as part of Chromium. This can be done by first checking out Chromium's source code, and then adding the project to Chromium's DEPS file.

NW.js and very early versions of Electron are using this way for building.

The downside is, Chromium is a very large codebase and requires very powerful machines to build. For normal laptops, that can take more than 5 hours. So this greatly impacts the number of developers that can contribute to the project, and it also makes development slower.

Building Chromium as a single shared library

As a user of Content Module, Electron does not need to modify Chromium's code under most cases, so an obvious way to improve the building of Electron is to build Chromium as a shared library, and then link with it in Electron. In this way developers no longer need to build all off Chromium when contributing to Electron.

libchromiumcontent 项目是由 @aroben 为此目的创建的。 It builds the Content Module of Chromium as a shared library, and then provides Chromium's headers and prebuilt binaries for download. 它构建Chromium的内容 模块作为共享的库,然后提供Chromium的标题 并预建二进制二进制文件供下载。

亮度 项目也是作为libchromiumcontent的一部分生来的, 它提供了内容模块周围的薄层。

By using libchromiumcontent and brightray together, developers can quickly build a browser without getting into the details of building Chromium. And it removes the requirement of a fast network and powerful machine for building the project.

Apart from Electron, there were also other Chromium-based projects built in this way, like the Breach browser.

Filtering exported symbols

On Windows there is a limitation of how many symbols one shared library can export. As the codebase of Chromium grew, the number of symbols exported in libchromiumcontent soon exceeded the limitation.

The solution was to filter out unneeded symbols when generating the DLL file. It worked by providing a .def file to the linker, and then using a script to judge whether symbols under a namespace should be exported.

By taking this approach, though Chromium kept adding new exported symbols, libchromiumcontent could still generate shared library files by stripping more symbols.

Component build

Before talking about the next steps taken in libchromiumcontent, it is important to introduce the concept of component build in Chromium first.

As a huge project, the linking step takes very long in Chromium when building. Normally when a developer makes a small change, it can take 10 minutes to see the final output. To solve this, Chromium introduced component build, which builds each module in Chromium as separated shared libraries, so the time spent in the final linking step becomes unnoticeable.

Shipping raw binaries

With Chromium continuing to grow, there were so many exported symbols in Chromium that even the symbols of Content Module and Webkit were more than the limitation. It was impossible to generate a usable shared library by simply stripping symbols.

最后,我们必须 运送原始二进制的 Chromium 而不是 生成一个单一的共享库。

As introduced earlier there are two build modes in Chromium. As a result of shipping raw binaries, we have to ship two different distributions of binaries in libchromiumcontent. One is called static_library build, which includes all static libraries of each module generated by the normal build of Chromium. The other is shared_library, which includes all shared libraries of each module generated by the component build.

In Electron, the Debug version is linked with the shared_library version of libchromiumcontent, because it is small to download and takes little time when linking the final executable. And the Release version of Electron is linked with the static_library version of libchromiumcontent, so the compiler can generate full symbols which are important for debugging, and the linker can do much better optimization since it knows which object files are needed and which are not.

So for normal development, developers only need to build the Debug version, which does not require a good network or powerful machine. Though the Release version then requires much better hardware to build, it can generate better optimized binaries.

The gn update

Being one of the largest projects in the world, most normal systems are not suitable for building Chromium, and the Chromium team develops their own build tools.

Earlier versions of Chromium were using gyp as a build system, but it suffers from being slow, and its configuration file becomes hard to understand for complex projects. After years of development, Chromium switched to gn as a build system, which is much faster and has a clear architecture.

One of the improvements of gn is to introduce source_set, which represents a group of object files. In gyp, each module was represented by either static_library or shared_library, and for the normal build of Chromium, each module generated a static library and they were linked together in the final executable. By using gn, each module now only generates a bunch of object files, and the final executable just links all the object files together, so the intermediate static library files are no longer generated.

This improvement however made great trouble to libchromiumcontent, because the intermediate static library files were actually needed by libchromiumcontent.

The first try to solve this was to patch gn to generate static library files, which solved the problem, but was far from a decent solution.

第二次尝试由 @alespergll从对象文件列表中生成自定义静态库。 It used a trick to first run a dummy build to collect a list of generated object files, and then actually build the static libraries by feeding gn with the list. It only made minimal changes to Chromium's source code, and kept Electron's building architecture still.

摘要

As you can see, compared to building Electron as part of Chromium, building Chromium as a library takes greater efforts and requires continuous maintenance. However the latter removes the requirement of powerful hardware to build Electron, thus enabling a much larger range of developers to build and contribute to Electron. The effort is totally worth it.
Electron Internals: Weak References

· 阅读时间:约 6 分钟

As a language with garbage collection, JavaScript frees users from managing resources manually. But because Electron hosts this environment, it has to be very careful avoiding both memory and resources leaks.

This post introduces the concept of weak references and how they are used to manage resources in Electron.


Weak references

In JavaScript, whenever you assign an object to a variable, you are adding a reference to the object. As long as there is a reference to the object, it will always be kept in memory. Once all references to the object are gone, i.e. there are no longer variables storing the object, the JavaScript engine will recoup the memory on next garbage collection.

A weak reference is a reference to an object that allows you to get the object without effecting whether it will be garbage collected or not. You will also get notified when the object is garbage collected. It then becomes possible to manage resources with JavaScript.

Using the NativeImage class in Electron as an example, every time you call the nativeImage.create() API, a NativeImage instance is returned and it is storing the image data in C++. Once you are done with the instance and the JavaScript engine (V8) has garbage collected the object, code in C++ will be called to free the image data in memory, so there is no need for users manage this manually.

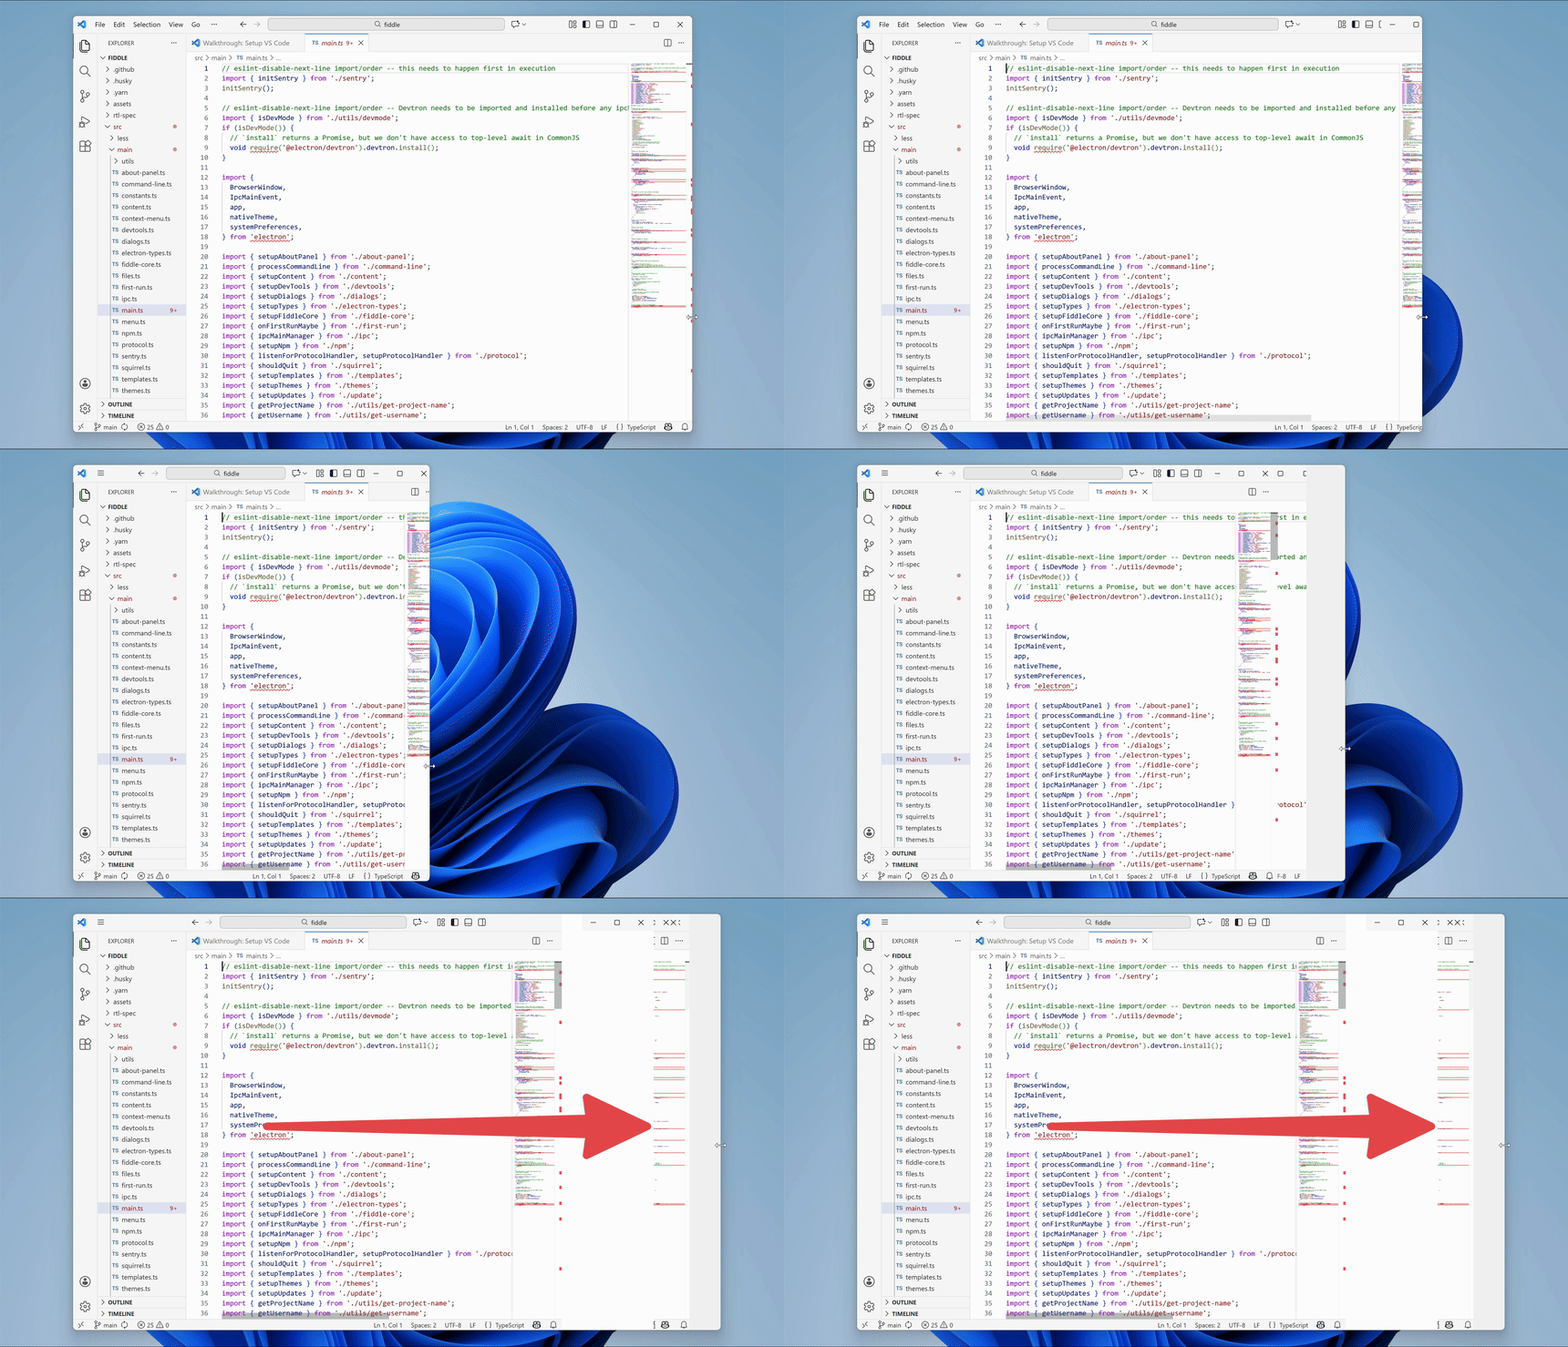
另一个例子是 窗口消失的问题, 哪些 视觉显示当所有引用都消失时窗口是如何收集垃圾的

Testing weak references in Electron

There is no way to directly test weak references in raw JavaScript since the language doesn't have a way to assign weak references. The only API in JavaScript related to weak references is WeakMap, but since it only creates weak-reference keys, it is impossible to know when an object has been garbage collected.

In versions of Electron prior to v0.37.8, you can use the internal v8Util.setDestructor API to test weak references, which adds a weak reference to the passed object and calls the callback when the object is garbage collected:

// 下面的代码只能在 Electron < v0.37.8. 上运行。
var v8Util = process.atomBinding('v8_util');

var object = {};
v8Util.setDestructor(object, function () {
console.log('The object is garbage collected');
});

// Remove all references to the object.
object = undefined;
// Manually starts a GC.
gc();
// Console prints "The object is garbage collected".

Note that you have to start Electron with the --js-flags="--expose_gc" command switch to expose the internal gc function.

The API was removed in later versions because V8 actually does not allow running JavaScript code in the destructor and in later versions doing so would cause random crashes.

Weak references in the remote module

Apart from managing native resources with C++, Electron also needs weak references to manage JavaScript resources. Electron的 远程 模块就是一个例子。 这是一个 远程程序调用 (RPC) 模块 允许在主进程中使用渲染器进程中的物体。

One key challenge with the remote module is to avoid memory leaks. When users acquire a remote object in the renderer process, the remote module must guarantee the object continues to live in the main process until the references in the renderer process are gone. Additionally, it also has to make sure the object can be garbage collected when there are no longer any reference to it in renderer processes.

For example, without proper implementation, following code would cause memory leaks quickly:

const { remote } = require('electron');

for (let i = 0; i < 10000; ++i) {
remote.nativeImage.createEmpty();
}

The resource management in the remote module is simple. Whenever an object is requested, a message is sent to the main process and Electron will store the object in a map and assign an ID for it, then send the ID back to the renderer process. In the renderer process, the remote module will receive the ID and wrap it with a proxy object and when the proxy object is garbage collected, a message will be sent to the main process to free the object.

Using remote.require API as an example, a simplified implementation looks like this:

remote.require = function (name) {
// Tell the main process to return the metadata of the module.
const meta = ipcRenderer.sendSync('REQUIRE', name);
// Create a proxy object.
const object = metaToValue(meta);
// Tell the main process to free the object when the proxy object is garbage
// collected.
v8Util.setDestructor(object, function () {
ipcRenderer.send('FREE', meta.id);
});
return object;
};

在主进程:

const map = {};
const id = 0;

ipcMain.on('REQUIRE', function (event, name) {
const object = require(name);
// Add a reference to the object.
map[++id] = object;
// 将对象转换为元数据
event.returnValue = valueToMeta(id, object);
});

ipcMain.on('FREE', function (event, id) {
delete map[id];
});

Maps with weak values

With the previous simple implementation, every call in the remote module will return a new remote object from the main process, and each remote object represents a reference to the object in the main process.

The design itself is fine, but the problem is when there are multiple calls to receive the same object, multiple proxy objects will be created and for complicated objects this can add huge pressure on memory usage and garbage collection.

For example, the following code:

const { remote } = require('electron');

for (let i = 0; i < 10000; ++i) {
remote.getCurrentWindow();
}

It first uses a lot of memory creating proxy objects and then occupies the CPU (Central Processing Unit) for garbage collecting them and sending IPC messages.

An obvious optimization is to cache the remote objects: when there is already a remote object with the same ID, the previous remote object will be returned instead of creating a new one.

This is not possible with the API in JavaScript core. 使用普通的Map对象保存对象将会防止被V8垃圾回收机制回收,但是,WeakMap 只能将对象作为弱引用。

To solve this, a map type with values as weak references is added, which is perfect for caching objects with IDs. Now the remote.require looks like this:

const remoteObjectCache = v8Util.createIDWeakMap()

remote.require = function (name) {
// Tell the main process to return the meta data of the module.
...
if (remoteObjectCache.has(meta.id))
return remoteObjectCache.get(meta.id)
// Create a proxy object.
...
remoteObjectCache.set(meta.id, object)
return object
}

Note that the remoteObjectCache stores objects as weak references, so there is no need to delete the key when the object is garbage collected.

Native code

For people interested in the C++ code of weak references in Electron, it can be found in following files:

The setDestructor API:

The createIDWeakMap API:

Electron Internals: Using Node as a Library

· 阅读时间:约 5 分钟

This is the second post in an ongoing series explaining the internals of Electron. Check out the first post about event loop integration if you haven't already.

Most people use Node for server-side applications, but because of Node's rich API set and thriving community, it is also a great fit for an embedded library. This post explains how Node is used as a library in Electron.


构建系统

节点和 Electron 都使用 GYP 作为他们的构建系统。 If you want to embed Node inside your app, you have to use it as your build system too.

New to GYP? 新建 GYP? Read this guide before you continue further in this post.

Node's flags

个节点。 yp 节点源代码目录中的文件描述节点 是如何构建的, 加上许多 GYP 变量来控制 节点的哪些部分已启用以及是否打开某些配置。

To change the build flags, you need to set the variables in the .gypi file of your project. The configure script in Node can generate some common configurations for you, for example running ./configure --shared will generate a config.gypi with variables instructing Node to be built as a shared library.

Electron does not use the configure script since it has its own build scripts. 节点配置在 common.gypi 文件 中定义了 Electron的根源代码目录。

In Electron, Node is being linked as a shared library by setting the GYP variable node_shared to true, so Node's build type will be changed from executable to shared_library, and the source code containing the Node's main entry point will not be compiled.

Since Electron uses the V8 library shipped with Chromium, the V8 library included in Node's source code is not used. This is done by setting both node_use_v8_platform and node_use_bundled_v8 to false.

Shared library or static library

When linking with Node, there are two options: you can either build Node as a static library and include it in the final executable, or you can build it as a shared library and ship it alongside the final executable.

In Electron, Node was built as a static library for a long time. This made the build simple, enabled the best compiler optimizations, and allowed Electron to be distributed without an extra node.dll file.

然而,Chrome切换到使用 BoringSSL 后改变了这种情况。 BoringSSL is a fork of OpenSSL that removes several unused APIs and changes many existing interfaces. 因为节点仍在使用 OpenSSL,编译器会产生无数的 链接错误,如果它们是相互冲突的符号连接在一起的话。 Because Node still uses OpenSSL, the compiler would generate numerous linking errors due to conflicting symbols if they were linked together.

Electron 无法在节点中使用 BoringSSL 或在 Chromium 中使用 OpenSSL 所以唯一的 选项是切换到构建节点作为共享库, 和 隐藏每个组件中的 BoringSSL 和 OpenSSL 符号

This change brought Electron some positive side effects. Before this change, you could not rename the executable file of Electron on Windows if you used native modules because the name of the executable was hard coded in the import library. After Node was built as a shared library, this limitation was gone because all native modules were linked to node.dll, whose name didn't need to be changed.

Supporting native modules

节点工作中的原生模块 ,定义节点加载的条目函数。 然后从节点中搜索V8和libuv 的符号。 This is a bit troublesome for embedders because by default the symbols of V8 and libuv are hidden when building Node as a library and native modules will fail to load because they cannot find the symbols.

So in order to make native modules work, the V8 and libuv symbols were exposed in Electron. For V8 this is done by forcing all symbols in Chromium's configuration file to be exposed. For libuv, it is achieved by setting the BUILDING_UV_SHARED=1 definition.

Starting Node in your app

After all the work of building and linking with Node, the final step is to run Node in your app.

Node doesn't provide many public APIs for embedding itself into other apps. 通常您只能调用 节点:start节点::Init 开始 新的节点实例。 However, if you are building a complex app based on Node, you have to use APIs like node::CreateEnvironment to precisely control every step.

In Electron, Node is started in two modes: the standalone mode that runs in the main process, which is similar to official Node binaries, and the embedded mode which inserts Node APIs into web pages. The details of this will be explained in a future post.

Electron Internals: Message Loop Integration

· 阅读时间:约 4 分钟

This is the first post of a series that explains the internals of Electron. This post introduces how Node's event loop is integrated with Chromium in Electron.


node-gui for GTK+ bindings, and node-qt for QT bindings. 但其中没有一个在生产中工作,因为图形界面工具包有自己的消息 循环,而诺德则在自己的事件循环中使用 libuv , 并且主线程只能同时运行 个循环。 But none of them work in production because GUI toolkits have their own message loops while Node uses libuv for its own event loop, and the main thread can only run one loop at the same time. So the common trick to run GUI message loop in Node is to pump the message loop in a timer with very small interval, which makes GUI interface response slow and occupies lots of CPU resources.

During the development of Electron we met the same problem, though in a reversed way: we had to integrate Node's event loop into Chromium's message loop.

The main process and renderer process

Before we dive into the details of message loop integration, I'll first explain the multi-process architecture of Chromium.

Electron 有两种类型的进程:主进程和渲染器 进程(这实际上是非常简化的, 完整的视图请查看 多进程架构。 The main process is responsible for GUI work like creating windows, while the renderer process only deals with running and rendering web pages.

Electron allows using JavaScript to control both the main process and renderer process, which means we have to integrate Node into both processes.

Replacing Chromium's message loop with libuv

My first try was reimplementing Chromium's message loop with libuv.

It was easy for the renderer process, since its message loop only listened to file descriptors and timers, and I only needed to implement the interface with libuv.

However it was significantly more difficult for the main process. Each platform has its own kind of GUI message loops. macOS Chromium uses NSRunLoop, whereas Linux uses glib. I tried lots of hacks to extract the underlying file descriptors out of the native GUI message loops, and then fed them to libuv for iteration, but I still met edge cases that did not work.

So finally I added a timer to poll the GUI message loop in a small interval. As a result the process took a constant CPU usage, and certain operations had long delays.

Polling Node's event loop in a separate thread

As libuv matured, it was then possible to take another approach.

The concept of backend fd was introduced into libuv, which is a file descriptor (or handle) that libuv polls for its event loop. So by polling the backend fd it is possible to get notified when there is a new event in libuv.

So in Electron I created a separate thread to poll the backend fd, and since I was using the system calls for polling instead of libuv APIs, it was thread safe. And whenever there was a new event in libuv's event loop, a message would be posted to Chromium's message loop, and the events of libuv would then be processed in the main thread.

In this way I avoided patching Chromium and Node, and the same code was used in both the main and renderer processes.

The code

您可以在 electron/atom/common/ 目录下node_bindings 文件中找到消息循环集成的实现方式。 It can be easily reused for projects that want to integrate Node.

Update: Implementation moved to electron/shell/common/node_bindings.cc.